How to make a QR code by hand: draw, paint, stencil or stitch it
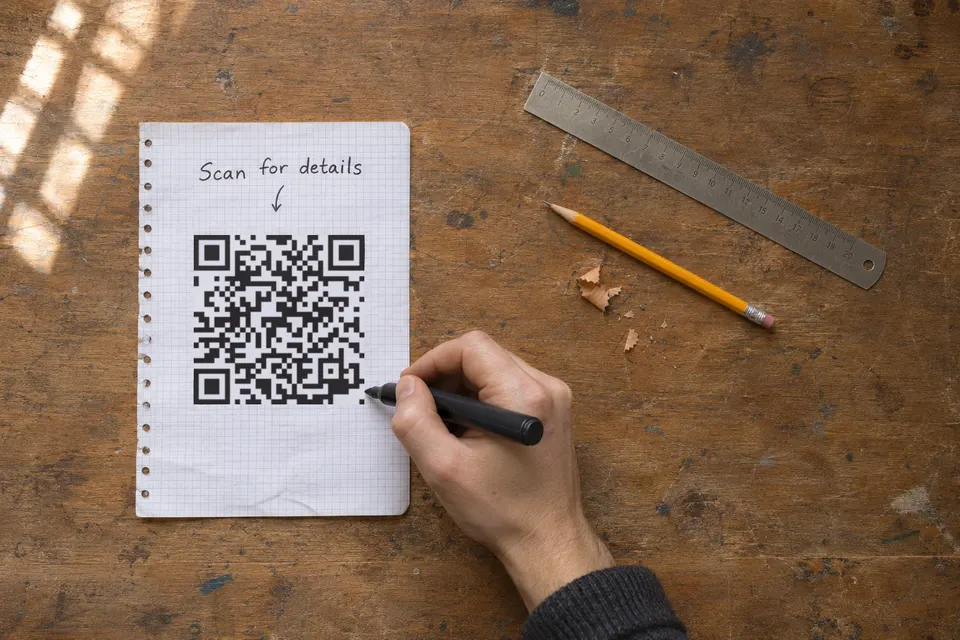
Yes, a hand-made QR code scans. The scanner reads a grid of dark and light squares and does not care whether a printer, a paintbrush or a needle put them there. Copy the grid accurately, keep strong contrast, leave the blank border and test your chosen module size on the real material.
Size and transfer your handmade QR code
- Generate the code and scan the complete template on your screen or on paper.
- Count the modules along one side of the code itself, from the outer edge of one corner square to the other, without the border.
- Add the blank border of four modules on every side, eight in total. A code file downloaded from bebber already contains this border, so do not add a second one around it.
- Choose a module size your tool can make cleanly, and multiply it by the total from step 3.
- Transfer the pattern one row at a time, comparing each finished row with the template.
- When the whole pattern is done, scan it on the real material from the distance people will use.
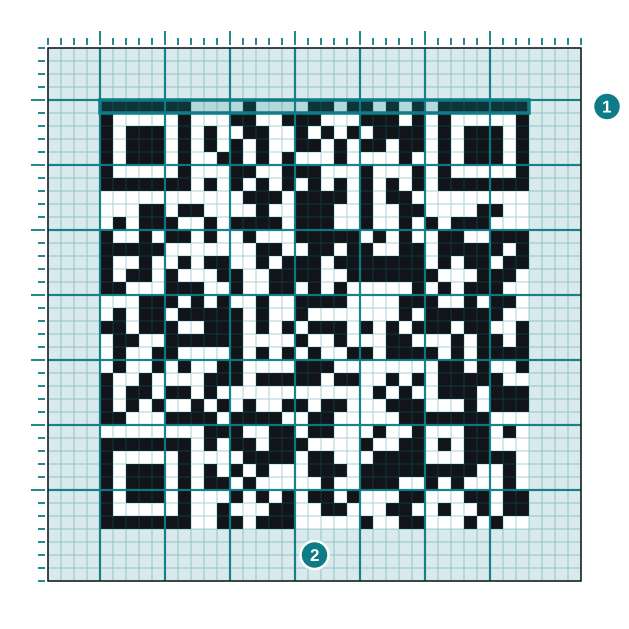
Worked example. A downloaded image of a version 1 code is 21 x 21 modules. With the border it spans 29 modules per side (21 + 4 + 4). At 10 mm per module for a painted wall, that is 29 x 10 = 290 mm square. At one stitch per module on 14-count Aida fabric, it is 29 / 14 = about 2.07 inches square, before any margin for framing.
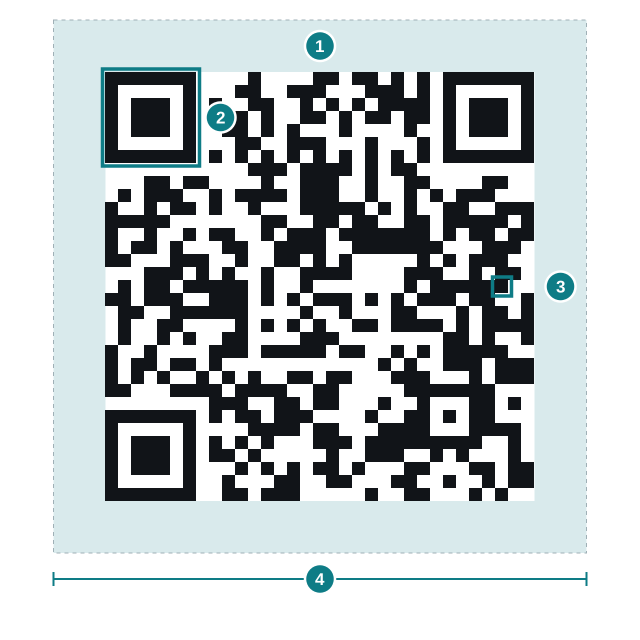
QR modules, corner patterns and the blank border
A code is a square grid of cells called modules. Version 1 is 21 x 21 modules, and each higher version adds 4 modules per side, up to version 40 at 177 x 177 (Denso Wave, the inventor of the QR code). So version 2 is 25 x 25, version 3 is 29 x 29 and version 4 is 33 x 33.
- The three large squares in the corners (finder patterns) must be exact. The phone uses them to find the code and its orientation.
- Leave a clear border at least four modules wide on every side. Denso Wave’s specification says a QR code “requires a four-module wide margin at all sides of a symbol” (how to make a QR code).
- Error correction can recover some damaged data. The levels L, M, Q and H restore about 7, 15, 25 and 30 % of the codewords, and Denso Wave notes that a higher level also increases the code’s size (error correction). These percentages count codewords, not how many squares you may copy wrongly. Copy the generated pattern accurately and treat error correction as a reserve.
Methods by craft
| Craft | What goes wrong | Fix |
|---|---|---|
| Graph paper | Cells drift into the wrong column | Trace a printed template onto a ruled grid, one row at a time |
| Wall painting | Uneven grid and rough surface blur modules | Measured grid, clean light base |
| Stencil | Enclosed light areas fall out | Bridges of stencil material |
| Cross-stitch | A miscounted stitch shifts the rest | One stitch per module, rows ticked off |
| Machine embroidery | Jump stitches hide light areas | Trim jumps, support the fabric |
Wall painting. One maker painted a code on a shield by drawing a box, marking a point every inch with a yardstick, drawing perpendicular lines with an L square and checking spacing with calipers. The surface was cleaned and painted a light colour first, and the code was painted dark over the grid (Make: painting a one-off QR code).
Stencil. Dark paint goes through the cut-out areas, so every enclosed light area is a loose island of stencil material with nothing holding it. The creator of the free QR_STENCILER tool says it “automatically detects and bridges these islands, using thin lines”, with an adjustable amount of bridging. Bridges are narrow strips of stencil material that connect each island to the surrounding sheet. They leave thin unpainted lines across the dark areas, so test the finished stencil. The tool outputs a PDF for laser cutting and runs in Processing, so it needs to be downloaded and set up; see its repository for the current version requirements.
Cross-stitch. A cross-stitch template generator maps one module to one stitch and gives the finished size as modules divided by stitches per inch. Include the four-module border in the stitch count, as in the example above.
Machine embroidery. A hobbyist’s tutorial reports that 1.5 inches square was the smallest size at which her embroidered codes read reliably in her setup. She recommends trying finer 60wt or 90wt thread for cleaner edges on small designs, and cut-away or no-show mesh stabiliser for stretchy fabric. Because a QR code has many isolated stitch areas, short jump threads remain, and they must be trimmed on the front or they hide the empty spaces. The 1.5-inch result applies to her setup; test your own design on scrap fabric first.
Choose module size and test the finished pattern
Keep the module count low. Each extra version adds four rows and four columns to draw, stitch or cut. Make each module a size your tool can hold cleanly: the wider the pen, brush or thread, the larger each module must be.
An unfinished code’s scan result is not a reliable check of your copying, so use the row-by-row comparison from the steps above.
Use a bebber for content you will update
If the code encodes a web address on a domain you own, a static code works well: you can edit that page whenever you like, as long as you keep the domain and the page. A bebber is for people with no website to point at, or who do not want to run one. It is a mobile page behind a QR code, and the page stays editable through an emailed edit link after the wall is painted or the cushion is stitched. A password can be added for free. Content is private by default and not indexed by search engines.
The code depends on bebber running; if bebber stopped operating, its codes would stop resolving, so use a static code to your own domain for a piece that must outlast any service. The guide do QR codes expire compares what seven tools say about expiry. The grid size also depends on the payload: a bebber code encodes a web address, and short plain text may need fewer modules. Compare the generated grids before choosing a craft, and check the module count of your own bebber code.
bebber is free, needs no account, and has no expiry or scan limit. To get a template with plain square modules, open /create, choose “Dot shape” and then “Square”, and check that the live preview shows square modules. Download the code as SVG, PNG or PDF, print it and scan the printout before you transfer the pattern. The image is (modules + 8) x module size wide, so the module size is the image width divided by (modules + 8).
Without an uploaded logo, bebber places a small bebber logo in the centre of the code, at most 25 % of the code’s edge length. It covers some squares and the code relies on error correction there, and a hand copy cannot reproduce it as squares. No setting that switches the default logo off was found in the code, so the centre of your copy needs a test: scan the finished piece, because a copy that leaves the centre as plain squares is not guaranteed to read. A plain text code from any generator has no logo.
For other materials, see the laser-engraving guide or the 3D-printing size table.
Create your bebber, then copy its QR pattern onto your material.
Sources
- Denso Wave, the inventor of the QR code qrcode.com
- how to make a QR code qrcode.com
- error correction qrcode.com
- Make: painting a one-off QR code makezine.com
- QRSTENCILER flong.com
- repository github.com
- cross-stitch template generator qr-templates.pages.dev
- tutorial sewingmachinefun.com
Read next
Will a QR code tattoo still scan in ten years?
A QR code tattoo can scan today, but ten years depends on how the ink ages and on what the code points to. Size table, three link options, checklist.
How big a 3D printed QR code must be to scan
3D printed QR code sizes for a 0.4 mm nozzle: module size, the four-module border, a width table and printing steps in PrusaSlicer.
Attach a video or voice message to a gift with a QR code
Put a QR code on a gift card or tag that opens your video or voice message. File limits, print size, where to place it and what to test before wrapping.
Ready to make your own?
Same idea, your content — done in about a minute.
Create your bebberNo sign-up. No credit card. Free forever.